Monday, February 21, 2011

Seed Starts (cont...)

OK.. here I am planting the pepper seeds in a Flat of Start pots. I was amazed at how quick the seeds germinated (4 or 5 days) and how long the little tap roots grew in a day.

I first fill my flat with potting soil, and tamp it so its not too loose. Then with a pencil I poke and twist to make perfect funnel shaped holes. I then pick up the sprout with a toothpick (use whatever works for you). It's best not to pick it up with your fingers because it's so easy to damage the little tender tap root. Place the sprout in the hole root first (heads up) so that the head of the sprout is about 1/4" under the surface. Then just scrape the soil over the sprout to cover and LIGHTLY tamp it firm.

I planted 2 Flats of 36 cells each on Saturday 2/19/11. One Flat was the Large Thai Chile pepper and one Flat of Heirloom Irish Tomatoes.

This morning, Monday 2/21/11, I was pleased to see one of the Irish tomatoes had broke surface. It's ON now!! YAY!!!

Here are some pics.

(Click the pic for larger view, use Back Button to return.)


Saturday, February 19, 2011

First to Germinate.

As I mentioned earlier... one of the reasons I pre-germinate some seeds, is it allows me to determine seeds of a greater vigor. Well here are a couple pictures that demonstrate this. Over this weekend there will be many more and I will plant these First Germinated in Starter pots and indicate on the pots that they were First to germinate. Then when planting in the garden I will keep track of those plants and keep seed from them in particular. This may seem to some gardeners a bit much, however it is all part of Selective Culturing and improves your particular strain of plant. In these pictures are the Large Thai Pepper seeds. It has only been 5 days since these seeds were placed in the germination bins (very quick for a pepper seed).

(click pic for larger image. use back button to return to page.)


I would also impart that it is very IMPORTANT to keep a Yearly Garden Journal. It should include seed/plant varieties, planting dates, notes over time on how well a strain of plant performed, yield etc, etc, etc... you get the idea. Your Garden Journal will become over time, a valuable tool to your increased success.

Keep it fun... just because it should be..... I have SO much joy sitting with a friend, having a beverage and conversation about the garden, the different plants, the success and failures, inventions & processes. It's a wonderful thing.

Wednesday, February 16, 2011

A Note about Germination Bins.

I would like to point out, 'Not all seeds need pre-germinating' before planting in stater pots. The seeds I tend to pre-germinate are ones that have a longer gestation period and very hard hauls. Peppers(hot & mild), fruit and berries such as the Pomegranate that I showed in an earlier post, some seeds from the Brassica family and on occasion certain Tomato seeds etc..
Several reasons I like to pre-germinate  my Pepper seeds: it eliminates the need to plant 2 or more seeds per cell in a 'flat of stater cups, a practice that used to insure that all cells have at least one start. Also, I can visually determine seeds of a "greater vigor" as they sprout. I also seem to have a greater 'per seed success'.

Most seeds DO NOT need pre-germinating before planting in starter pots. However, an 'over-night soaking' in water is beneficial to most ALL seeds before planting in starter pots or Direct Sowing in the garden.

Monday, February 14, 2011

How to make a Germination Bin

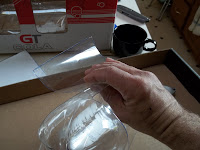
Here are the instructions for making a germination bin from a 2 Liter plastic bottle.

  • Fold a piece of paper in 4ths. cut one of the 4ths out. This is the template for the door on the bottle.
  • Place the paper on the side of the bottle and with a marker trace 3 sides of the square.

  • CAREFULLY! CAREFULLY!! Cut the 3 sides with a razor knife.

  • Now lift the door you have just created and nearly (but not quite) crease it backward. This will allow easier access. Also then, reverse curl the door as to relieve the tendency to curl in.

  • This is what it should look like after the above steps.


  • Now take a 3 inch piece of Duct Tape and stick half to the Center bottom edge of the door. Then Fold about a half inch of the tape unto itself to create a pull handle.
  • Now Place several layers of paper towel, napkins or a cloth (your choice) in the bottle to where it only fills the bottom horizontal round half way. Saturate the towels with water, (do NOT puddle). Place seeds on towel and close bottle.

  • Close and stick door shut ... place in a warm place and check every couple days to make sure the towels are still wet. If they need water then use a spray bottle and wet it down. I have found that a spray bottle is easiest, but do it how you like.


  • IMPORTANT!!!! Always label and date your bin and don't mix seeds, so you always know what you have.
Here are 2 alternate seed germinating bins, I use this style when I have fewer seeds of a variety to germinate. One is a 2 Liter bottle cut and inverted and the other is a plastic pint food container that had something from the deli (food) in it originally. In a container like the pint one, poke some slit holes in the top so it will breath some. This will also allow you to add water (if needed) without removing the lid. Remember NOTHING FANCY,  keep it simple. Re-Purpose, Re-Use, Recycle!!!

Some Pepper Seed Germination

Here I am germinating some pepper seeds .. Giant Thai and Bhut Jolakia the Ghost pepper.


The germination bins are made from 2 liter plastic bottles. Always remember to label and date them. I make it a practice never to mix seed in a single bin.

Saturday, February 12, 2011

2011 Seed list (partial list)

Here is the key to the vendors.

GRN = Gurney's http://gurneys.com/

JSS = Johnny's Selected Seeds http://www.johnnyseeds.com/

PGS = Pintree Garden Seeds https://www.superseeds.com/

SSE = Seed Savors Exchange http://www.seedsavers.org/

Category
Item
Description
Vendor/Ord#


Tomatoes
Cold Set
Dtrm. 65 day. Frost resistant.
Earliest to sow direct.
3”-4” fruit.
GRN #15125


Delicious
Indt. 77 days. Very large juicy
Full flavor.1 lb. plus fruit. Set
 world record with a 7lb.+  fruit.
GRN #15054


Current
Sweet pea
Indt. 75-80 day. The best red current
cherry tomato. Excellent flavor.
SSE #1230


Italian
Heirloom
Indt. 70-80 day. Most productive of
large 1lb.+ tomatoes. Full flavor.
SSE  #826


Wisconsin 55
Indt. 80 day. Univ. of Wisc. 1940.
Great for canning. Remembered as
one of the best home and market
All purpose.
SSE #1059


Large Red
Cherry
Indt. 75-80 day. Very old strain.
Extremely productive. 1.5”-2” fruit.
Preferred for whole canning.
SSE #828


Opalka
Polish Torpedo
Indt. 85 day. Circa. 1900. Phenomenal
set of  3”x 6” red paste tomatoes.
Holds well on vine.
PGS #414


Brassica


Cabbage
(late variety)
Kroutman (F1)
73 day. White, hard dense cabbage
resistant to splitting. Specifically
grown for making sauerkraut. Great
for slaw and other uses too.
PGS #64


Mammoth
Red Rock
98 day. Heirloom 1906. Solid uniform,
 8” diameter, 7lb.Very dependable.
Red throughout. Small to medium core.
 Fine Flavor. Largest of the red cabbage.
PGS #5801


Brussels
Sprouts

Long Island
Improved
85 day. Semi-dwarf no more then 2ft.
good yields of 1-2 inch  sprouts. Can set
50-100 sprouts per plant. Heirloom 1890
PGS #52


Falstaff
95 day. Open pollinated 2ft. plant with
unique purple-red sprouts. Milder then
green sprouts. Color intensifies with frost
PGS #53


Cauliflower
Romanesco
(F1)
75-80 day. Large unique head.
The florets form pointed fractal patterns.
Amazing fresh taste. Almost nutty.
PGS #W252


Kohlrabi
Early White
Vienna
55 day. Excellent nut-like flavor. Has few
leaves. 
GRN #14665


Kossak (F1)
80 day. Giant 8” diameter. Keeps well
 storage in cold storage. Sweet ever when
large. Peel “skin” before cooking or
eating fresh.
JSS #237


Pac Choi
Joy Choi (F1)
50 day. Heavy & vigorous.
12-15 inch tall
JSS #507


Mustard
Green Wave
50 day. Verdant dark green 2ft. plant.
Improves in flavor after light frost.
PGS #192


Kale
Dwarf Blue
Curled Scotch
55 day. Heirloom 1863. So attractive can
be grown for appearance alone. Great
flavor. Compact 1ft plant. Sow 4 to1sq ft.
PGS #191


Turnip
Topper
35day. Grown primarily for the leaves.
Dark green, crisp and delicious.
PGS #433


Purple Top-
White Globe

55 day. Fine grained and large.
Light frost enhances flavor. Good fall
crop.
GRN #14722


Rutabagas
Laurentian
100 day. 4-6 inch roots are mild, sweet
and firm. Excellent keeper.
GRN #66305


Beets


Boltardy
46 days. VERY resistant to bolting.
Size of a tennis ball. Color strong. Sweet.
PGS #3201


Crosby
Egyptian
45 day. Heirloom 1880. Large flattened
grow mainly above ground. Very Sweet.
PGS #33


Cylindra
58 day. 6-8 inch long. 1.5 – 2 inch diam.
Great for pickling or slicing fresh.
PGS #30